How to Build a Business Website (Non-Technical Guide)
Build a professional business website in 1 to 2 weeks for under $600 per year, with no coding required. Step-by-step walkthrough with real costs.

In This Article
A DIY business website costs $192 to $600 per year using builders like Squarespace ($16 to $23/month) or Wix ($17 to $29/month). You need a domain name ($10 to $15/year), a platform subscription, and about 5 to 10 hours of your time. No technical experience is required. Start with a 14-day free trial on Squarespace or Wix to test before you commit.
7
Total Steps
$192–$600
Est. Cost
1-2 weeks
Timeline
Easy
Difficulty
You can launch a professional business website for as little as $16 per month using a drag-and-drop website builder, with zero coding skills required. The entire process takes 1 to 2 weeks if you handle it yourself, or 4 to 6 weeks if you hire a freelance designer. This guide walks you through every step, from choosing a platform to going live, with real costs and provider comparisons updated for 2026.
Before you touch a website builder, gather these items so you do not stall halfway through the process.
- Your business name (finalized and ideally matching your desired domain)
- An EIN or business registration (not required for the website itself, but you will need it for payment processing if selling online; see the EIN application guide)
- A logo file in PNG or SVG format (if you do not have one yet, Canva offers a free logo maker)
- 5 to 10 photos of your business, team, or products (real photos outperform stock images)
- Your written content or at least bullet points for Home, About, Services, and Contact pages
- Contact information including phone number, email, and physical address if applicable
- Social media handles so you can link your profiles from the site
You do not need any technical skills, coding knowledge, or prior website experience. Modern website builders like Squarespace and Wix use drag-and-drop editors that work like a slide deck. If you can use PowerPoint or Google Slides, you can build a business website.
The DIY website building process is genuinely straightforward, but a few things catch first-timers off guard.
Template paralysis is real. With 190+ templates on Squarespace and 800+ on Wix, you can spend days browsing. Limit yourself to 30 minutes of browsing, pick a template in your industry category, and start customizing. You can always switch later.
Content writing takes the longest. Most founders finish the visual design in a few hours but then stall for days (or weeks) writing their About page and service descriptions. Block out a single afternoon to write all four core pages in one sitting.
Domain verification is not instant. If Google verifies your Business Profile by postcard, expect 5 to 14 days of waiting. Plan for this so you are not frustrated when you cannot fully manage your listing right away.
Your site will not be perfect on launch day. That is fine. The businesses that succeed online are the ones that publish a solid version quickly and improve it over time, not the ones that polish endlessly before going live.
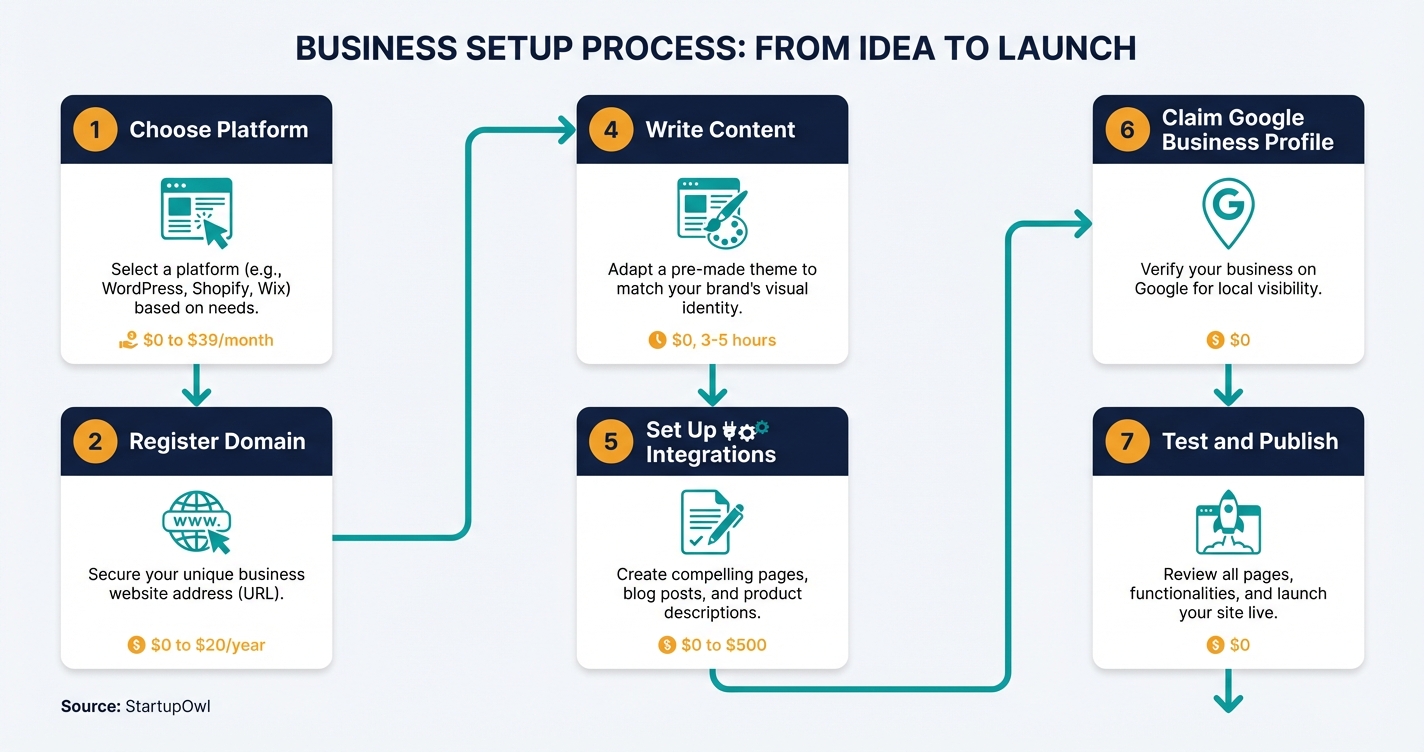
Step-by-Step Process
- 1
Choose Your Website Platform
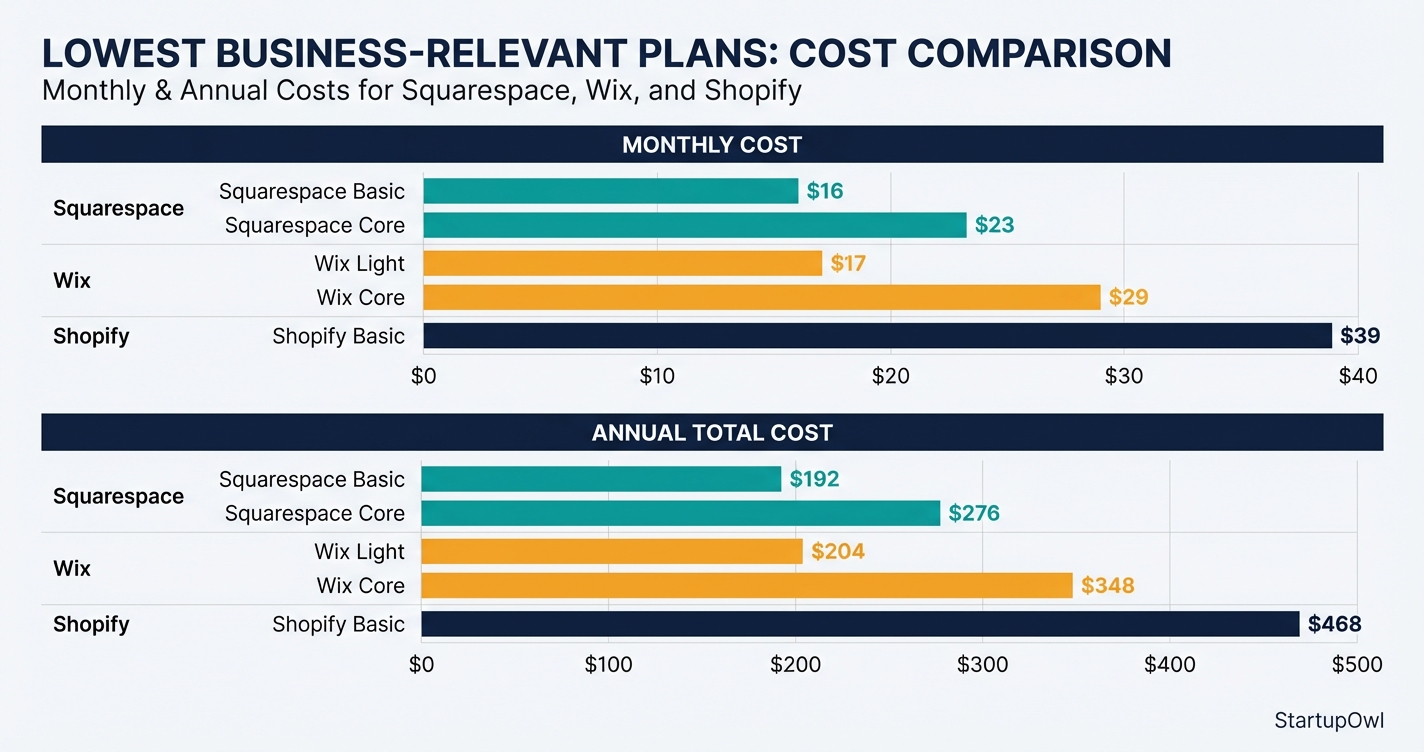
Pick a website builder that matches your business type and budget. For most small businesses, Squarespace and Wix are the top choices. Squarespace offers four plans ranging from $16 to $99 per month (billed annually), while Wix plans run from $17 to $159 per month.
If you plan to sell products online, Squarespace's Core plan at $23/month or Wix's Core plan at $29/month unlock e-commerce features. For a dedicated online store, Shopify starts at $39/month for the Basic plan. If you only need an informational site (no online sales), Squarespace Basic at $16/month or Wix Light at $17/month will do the job.
Every major builder offers a 14-day free trial. Build your site during the trial, then pick a paid plan only when you are ready to publish. Compare your top two choices in the best website builders for small business guide.
Tips
- Start a free trial on both Squarespace and Wix before committing so you can compare the editors side by side.
- Choose annual billing to save 25 to 40 percent compared to monthly billing, plus you typically get a free domain for the first year.
- If you need e-commerce, make sure you pick at least Squarespace Core ($23/month) or Wix Core ($29/month) to unlock payment processing.
Common Mistakes
- Starting with a complex self-hosted WordPress setup when a simple website builder would be faster and cheaper for a non-technical founder.
- Choosing the cheapest plan without checking whether it supports features you need (like custom domains, analytics, or e-commerce).
- 2
Register Your Domain Name
Your domain name is your web address (like yourbusiness.com). Standard .com domains cost $10 to $20 per year to register. Most website builder plans include a free domain for the first year when you choose annual billing, so check your plan first before buying separately.
If your builder does not include a free domain (or you want to register externally for more control), Namecheap offers .com domains starting around $6.49 for the first year with renewals at roughly $13 to $15/year. GoDaddy runs promotional pricing as low as $0.01 for the first year, but renewals jump to about $22/year.
Pick a domain that is short, easy to spell, and matches your business name. Avoid hyphens and numbers. Namecheap includes free WHOIS privacy protection; GoDaddy charges $10 to $15/year extra for this unless you opt for a bundled plan.
Tips
- Always choose a .com if it is available. It is the most recognized and trusted extension for business websites.
- Compare renewal pricing, not just first-year pricing, because you will pay the renewal rate for years to come.
Common Mistakes
- Falling for a $0.01 first-year domain deal without checking that the renewal price is $20 or more per year.
- Registering your domain through one provider and hosting through another without understanding how to connect DNS records (stick with your builder's included domain to keep it simple).
- 3
Select and Customize Your Template
Every major website builder includes hundreds of free, professionally designed templates organized by industry. Squarespace offers over 190 templates with its Blueprint AI feature that helps you build a customized starting point. Wix provides 800+ templates and an AI website builder that generates a draft site in minutes.
Pick a template designed for your industry (consulting, restaurant, retail, portfolio). Then customize the colors, fonts, and layout to match your brand. Upload your logo if you have one. Replace all placeholder images with your own photos or use royalty-free stock images from sites like Unsplash (free) or iStock ($10 to $30 per image).
Focus on these pages first: Home, About, Services (or Products), and Contact. You can always add more pages later. Keep the design clean and ensure all text is readable on mobile devices, which account for over 60% of web traffic.
Tips
- Start with a template close to what you want rather than building from scratch. Modifying an existing layout is significantly faster than starting blank.
- Test your site on a phone before publishing. Both Squarespace and Wix have built-in mobile preview modes.
- Limit your color palette to 2 to 3 brand colors and stick with 1 to 2 fonts for a professional appearance.
Common Mistakes
- Spending weeks perfecting every pixel before launch. A good-enough site that is live will generate more business than a perfect site that is still in draft.
- Using only low-resolution or generic stock photos, which makes your business look impersonal. Real photos of your team and workspace build trust faster.
- 4
Write Your Core Website Content
Your website needs at minimum 4 pages: Home, About, Services (or Products), and Contact. Write in plain language. Lead each page with what you do and who you serve, not your company history. Your homepage headline should answer one question: what problem do you solve?
For each service or product page, include the name, a brief description, the price (if applicable), and a clear call to action (like "Book a Call" or "Get a Quote"). Add your phone number, email, physical address (if applicable), and business hours to every page footer.
If writing is not your strength, both Squarespace and Wix now include AI text generators in their editors at no extra cost. You can also hire a freelance copywriter on Upwork for $200 to $500 for a 4-to-5-page small business site. Make sure to include basic SEO elements: a unique page title and meta description for every page, alt text on all images, and at least one heading per page.
$0 (DIY) or $200 to $500 (freelance copywriter) 4-8 hours (DIY) or 1-2 weeks (with a writer) upwork.comTips
- Write your homepage last, after you have written your Services and About pages. The homepage should summarize your strongest points from those pages.
- Include at least one clear call-to-action button on every page. Tell visitors exactly what to do next.
- Add a privacy policy page. Free generators are available at sites like Termly.io. This is required if you collect any user data (even a contact form).
Common Mistakes
- Writing about your company's history and values on the homepage instead of clearly stating what you offer and why someone should choose you.
- Forgetting to add a privacy policy, which is legally required if you collect emails or use contact forms and can expose you to CCPA or GDPR fines.
- 5
Set Up Essential Business Integrations
Before you go live, connect the tools that make your website actually work for your business. At minimum, set up Google Analytics (free) so you can track who visits your site and where they come from. Both Squarespace and Wix have one-click Google Analytics integrations.
If you take appointments, add a scheduling tool. Squarespace offers Acuity Scheduling starting at $14/month as an add-on. Wix includes a built-in booking system on Core plans and above. For e-commerce, set up your payment processor (Stripe or PayPal are built into both platforms) and configure shipping rates and tax collection.
Add a contact form to your Contact page and connect it to your business email. If you do not yet have a professional email address (like [email protected]), Squarespace Core and above include one free year of Google Workspace. After the first year, Google Workspace costs $6/month per user. Link your website to your social media profiles and embed your Instagram or Facebook feed if relevant to your audience.
Tips
- Set up Google Analytics on day one, even if you do not plan to check it right away. The data only starts accumulating after you install it.
- Use a professional business email ([email protected]) instead of a personal Gmail address. It dramatically improves customer trust.
Common Mistakes
- Launching your website with no analytics tracking, which means you have zero data on whether your site is actually attracting visitors.
- Forgetting to test your contact form after setup. Send yourself a test submission to confirm emails are delivered correctly.
- 6
Claim Your Google Business Profile
A Google Business Profile is 100% free and controls how your business appears on Google Search and Google Maps. It takes about 10 to 15 minutes to set up and is one of the most impactful things you can do for local visibility.
Go to business.google.com and follow the prompts to add your business name, category, address (or service area), phone number, and website URL. Google requires verification to confirm you are the real owner. Verification options include phone, email, postcard (takes 5 to 14 days), or video recording, depending on your business type.
Once verified, add your business hours, photos of your location or team, a business description, and your services. Businesses with complete profiles appear more credible and rank higher in local search results. Link your new website in the profile so that local searchers can click directly through to your site.
Tips
- Choose the most specific Google category for your business. Use 'Tax Preparation Service' instead of 'Financial Service' for better local ranking.
- Upload at least 5 high-quality photos. Profiles with photos get significantly more clicks and direction requests than profiles without.
- Ask your first few customers to leave Google reviews as soon as your profile is live. Reviews are a top local ranking factor.
Common Mistakes
- Skipping Google Business Profile entirely. Even online-only businesses benefit from the credibility and search visibility it provides.
- Using a personal Gmail address instead of your business email to manage the profile. If you ever bring on a partner or employee, transferring ownership of a personal account is messy.
- 7
Test Everything and Publish Your Site
Before hitting publish, run through a final checklist. Open every page on your phone and tablet to verify the layout is clean and readable. Click every link, button, and menu item to confirm they work. Submit your contact form and check that you receive the message. If you have e-commerce, complete a test purchase from start to checkout.
Verify that your SSL certificate is active (look for the padlock icon in the browser). All major website builders include free SSL certificates on paid plans, so this should be automatic. Check your page speed by running your URL through Google PageSpeed Insights (free). Aim for a score above 70 on mobile.
Once everything passes your review, publish the site and submit your sitemap to Google Search Console (free). This tells Google your site exists and speeds up indexing. Share your new URL on social media, email it to your network, and add it to your email signature. Plan to review and update your site content at least once per quarter.
Tips
- Ask a friend or family member to navigate your site and give honest feedback before you go live. Fresh eyes catch issues you have gone blind to.
- Submit your sitemap to Google Search Console on launch day. Without this step, it can take weeks for Google to discover and index your pages.
- Set a quarterly calendar reminder to update your site with new photos, testimonials, or service changes.
Common Mistakes
- Publishing without testing on mobile. If your site is hard to read or navigate on a phone, you are losing over half your potential visitors.
- Forgetting to submit your site to Google Search Console, which delays how quickly your pages appear in search results.
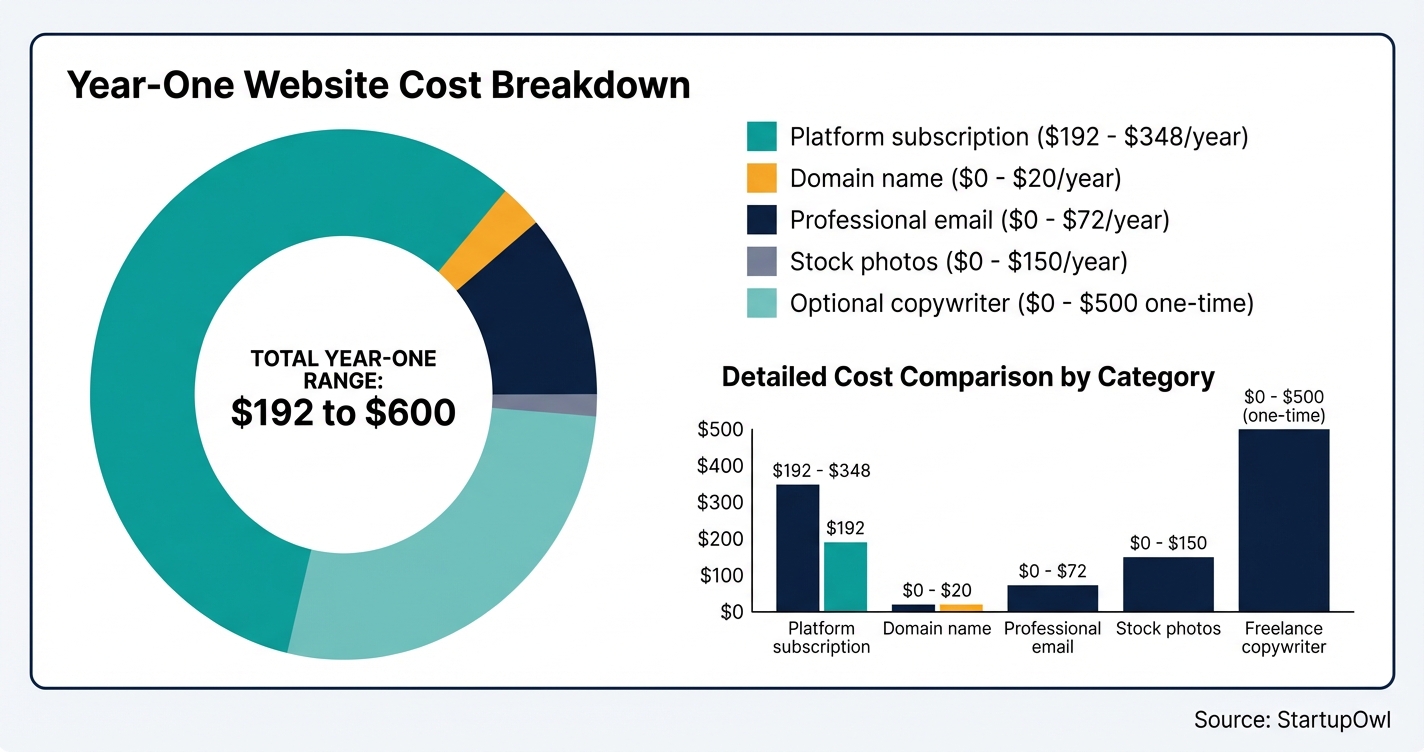
Your year-one website cost depends entirely on whether you build it yourself or hire help.
DIY with a website builder runs $192 to $600 per year. That covers your platform subscription ($16 to $29/month billed annually), a domain name (free the first year with most annual plans), and free SSL and hosting included in the plan. This is the right path for 90% of new businesses.
Hiring a freelance designer adds $1,500 to $4,000 as a one-time project cost, plus you still pay the ongoing platform subscription. A small agency build runs $6,000 to $20,000 for a custom site with strategic planning and ongoing support.
Budget $600 to $3,000 per year for ongoing maintenance starting in year two. This covers content updates, security patches, plugin updates (if using WordPress), and minor design tweaks. Skipping maintenance leads to broken pages, outdated information, and security vulnerabilities. For a full cost breakdown, see the business setup cost comparisons.
Your website is live. Here is what to do in the first 30 days to make it work harder for you.
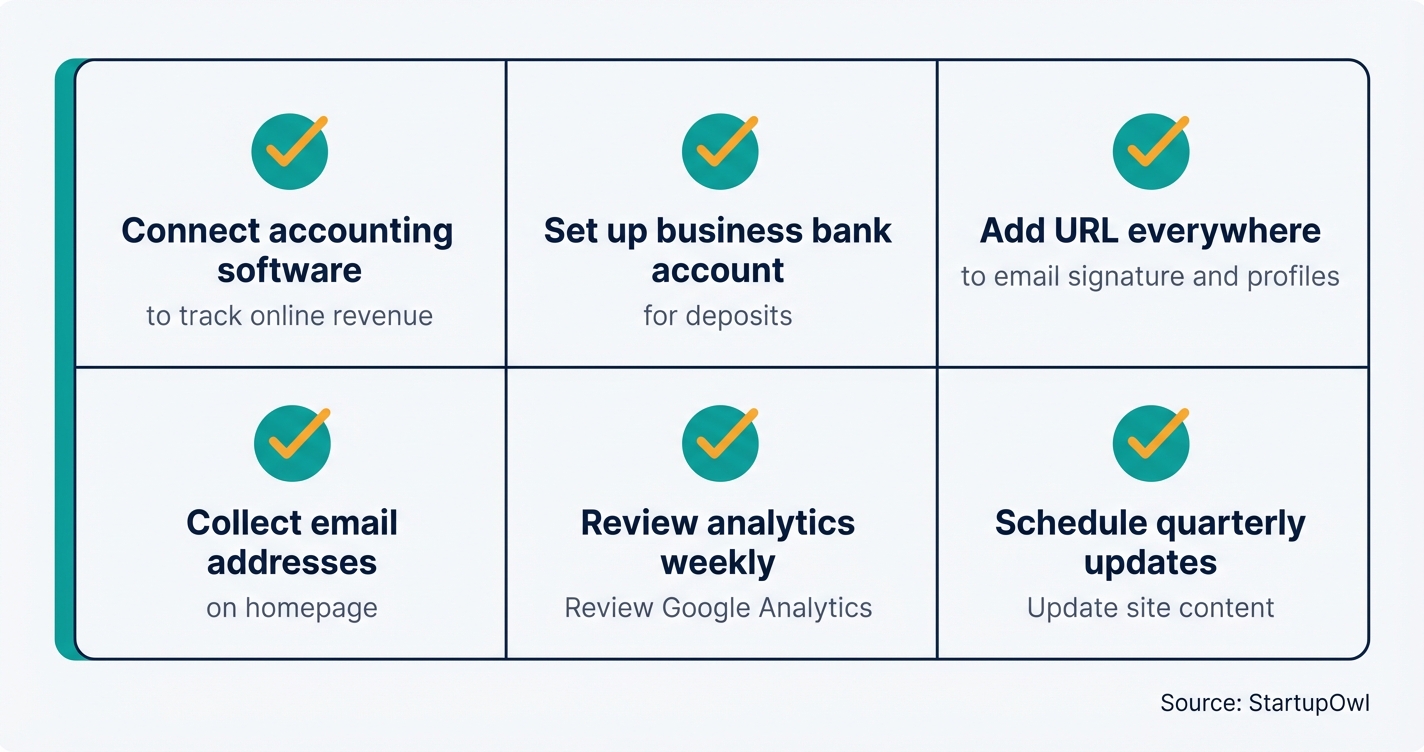
- Connect your website to your accounting software. If you sell online, integrate with QuickBooks or Xero to automatically track revenue. Squarespace and Wix both offer QuickBooks integrations.
- Set up your business bank account. If you have not opened one yet, follow the business bank account guide. Link it to your payment processor so you receive deposits from online sales.
- Add your website URL everywhere. Update your email signature, social media bios, Google Business Profile, business cards, and any directory listings with your new URL.
- Start collecting email addresses. Add a simple email signup form to your homepage. Both Squarespace and Wix include basic email marketing tools, or connect a free Mailchimp account (free up to 500 contacts).
- Review your analytics weekly. Check Google Analytics every Monday to see how many visitors found your site, which pages are most popular, and where traffic is coming from.
- Schedule quarterly content updates. Refresh your testimonials, update pricing, add blog posts, and swap seasonal photos at least every 3 months.
If you plan to run payroll or need business insurance, those are the next logical steps in your complete business setup journey.
The Complete Checklist
- Compare website builders and start a free trial01
Sign up for 14-day trials on Squarespace and Wix to test their editors.
1 hour$0 - Choose your plan and register a domain name02
Select annual billing to get a free domain and save 25 to 40 percent.
15 minutes$16 to $29/month - Select and customize a template03
Pick an industry-relevant template and update colors, fonts, and logo.
2-3 hours$0 - Write your Home, About, Services, and Contact pages04
Lead each page with what you do and who you serve.
4-8 hours$0 to $500 - Upload photos and media05
Add real business photos and optimize all images with alt text.
1-2 hours$0 to $150 - Add a privacy policy page06
Required if you collect any user data; use a free generator like Termly.io.
30 minutes$0 - Set up Google Analytics07
Connect Google Analytics to track visitor data from day one.
15 minutes$0 - Set up professional business email08
Create a [email protected] address through Google Workspace or your builder.
30 minutes$0 to $6/month - Test every page, link, and form on mobile and desktop09
Click every link, submit every form, and check page speed on PageSpeed Insights.
1 hour$0 - Publish your website10
Hit publish and share the URL on social media and in your email signature.
5 minutes$0 - Submit your sitemap to Google Search Console11
Verify site ownership and submit your sitemap to speed up Google indexing.
15 minutes$0 - Claim and complete your Google Business Profile12
Set up your free Google Business Profile with hours, photos, and your website link.
15 minutes plus 5-14 days for verification$0
These are the most expensive website mistakes new business owners make, and how to avoid them.
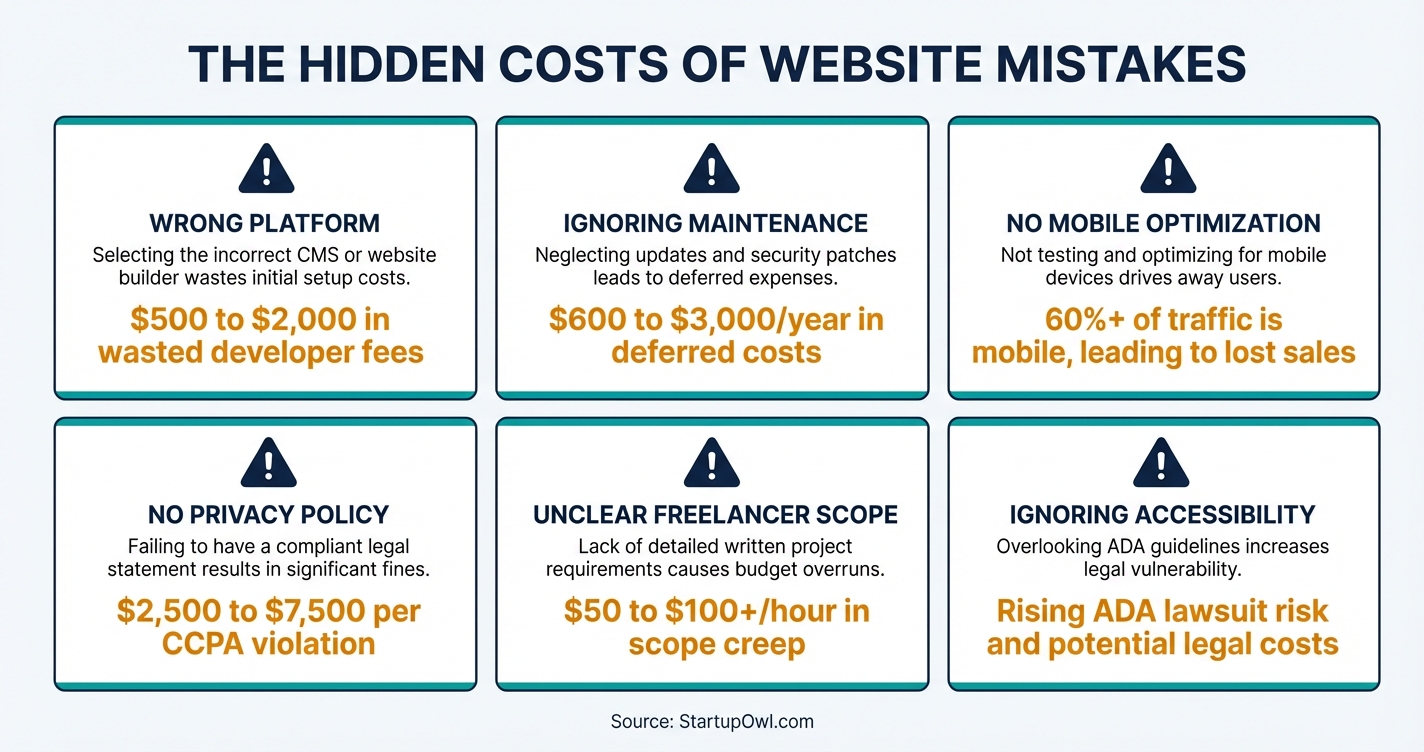
Choosing the wrong platform upfront. Starting with a complex self-hosted WordPress install when a $16/month Squarespace plan would cover your needs wastes weeks of setup time and often leads to $500 to $2,000 in developer fees to fix issues. Match your platform to your technical skill level and actual needs.
Ignoring maintenance costs after launch. Most founders budget only for the initial build and are blindsided by $600 to $3,000 per year in ongoing updates, security patches, and content refreshes. Budget for maintenance from day one.
Skipping a privacy policy. If your site has a contact form, email signup, or any analytics tracking, you are legally required to disclose your data practices. California's CCPA and the EU's GDPR impose fines of $2,500 to $7,500 per violation (CCPA) or up to 4% of annual revenue (GDPR) for non-compliance. Use a free privacy policy generator like Termly.io.
No mobile optimization. Over 60% of web traffic comes from mobile devices. If your site is unreadable on a phone, you are invisible to more than half your potential customers. Always test on mobile before publishing.
Hiring a freelancer with no clear scope. Without a flat project fee agreed upon in writing, hourly billing at $50 to $100+ per hour adds up fast. Scope creep on a loosely defined project can turn a $2,000 build into a $5,000+ ordeal. Always get a written proposal with a fixed price before work begins.
Ignoring web accessibility. Under the ADA, businesses open to the public are expected to make websites accessible to people with disabilities. Courts generally reference WCAG 2.1 Level AA as the compliance standard. ADA-related web accessibility lawsuits continue to rise, and settlements often include attorney fees and damages. Use your builder's built-in accessibility checker and add alt text to every image.
Frequently Asked Questions
A DIY business website costs $192 to $600 per year using a builder like Squarespace ($16 to $23/month) or Wix ($17 to $29/month), including hosting, SSL, and a free domain for the first year. Hiring a freelance designer adds $1,500 to $4,000 as a one-time project cost on top of the platform subscription. For a more complete breakdown, check the best website builders comparison.
Yes. Modern website builders like Squarespace and Wix use drag-and-drop editors that require zero coding knowledge. Both platforms offer AI-powered tools that can generate a draft site layout and even write initial copy for you. If you can create a PowerPoint presentation, you can build a website.
Most non-technical founders can build and launch a basic business website in 1 to 2 weeks working part-time (about 10 to 15 total hours). The template selection and content writing typically take the longest. If you hire a freelance designer, expect 4 to 6 weeks for a custom build.
For most small businesses, Squarespace ($16 to $23/month) offers the best balance of design quality and ease of use. Wix ($17 to $29/month) provides more template variety and a free plan for testing. If you sell physical products online, Shopify ($39/month) is the strongest e-commerce platform. See the full comparison in our best website builders for small business guide.
No. Squarespace, Wix, and Shopify all include web hosting, SSL certificates, and security updates in their monthly subscription price. You only need separate hosting if you choose a self-hosted platform like WordPress.org, which adds $3 to $30/month in hosting fees on top of any theme or plugin costs.
If your business is open to the public (retail, restaurant, professional services), courts have increasingly held that your website must be accessible to people with disabilities. The recommended standard is WCAG 2.1 Level AA. Add alt text to images, maintain a 4.5:1 color contrast ratio, and ensure keyboard navigation works. ADA-related lawsuits have risen steadily, so treating accessibility as a requirement (not optional) is the safest approach. Learn more at ADA.gov.
Build it yourself if your budget is under $1,000 and you need a straightforward informational site (Home, About, Services, Contact). Hire a freelance designer ($1,500 to $4,000) if you need custom branding, complex layouts, or e-commerce functionality and you value your time more than the cost. Hire an agency ($6,000+) only if you need ongoing strategic support and have the revenue to justify it.
Sources & References
About the Author
Head of Software Testing
Linda is the youngest but most technically literate member of the editorial team. She has a background in UX/UI design and previously worked at a B2B SaaS startup. She understands what makes software genuinely useful versus what is just a flashy dashboard masking a clunky backend.
Was this article helpful?
Questions about How to Build a Business Website (Non-Technical Guide)
No comments yet. Ask the first question and a member of our team will answer.
Leave a comment